Back to home page
Back to photography main page
Back to equipment page
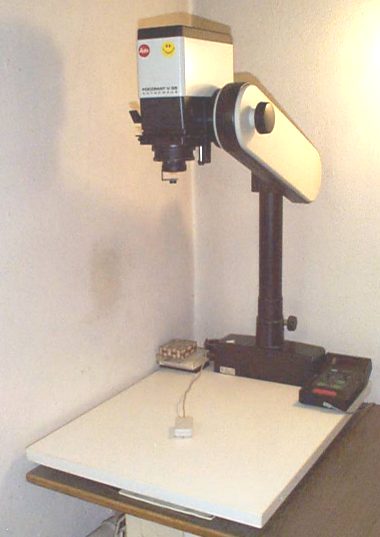 |
Dedicated to the 35mm, with an auto focus system and a slightly wide-angle lens, the
Leitz Focomat V35 is not a very conventional enlarger.
Worthy heir of the old IC and IIC models, its only drawbacks are the max format of 35mm and
the impossibility to swing and tilt the lens and film plane for distortion control.
Production stopped around 95, sales have slowed down as its price has increased
in an impressive manner during the years: from a 1800CHF price tag in 79-80', it was over
5000CHF around 95' ...
It's a pity because this enlarger has an outstanding optical and mechanical quality and
is particularly agreeable and fast to use.
Well, it's the nearly perfect enlarger. If you can find a used one at a good price, don't
let it go !
Summary:
|
- Format up to 35mm.
- Auto or manual focus.
- Leitz WA-Focotar 40mm f/2.8 lens, diaphragm with a luminous aperture scale and
disengageable click stops.
On some markets, it was also sold with a Rodenstock Ysaron 50mm f/3.5.
Any lens could be used with manual focus (standard Leica 39mm thread).
The AF cam is specific to the lens model and changing lens implies to lose
AF.
- Enlargement ratios from 3 to 16.5 with autofocus.
Smaller ratios possible with a manual focus.
Ratios up to 17.5 on the baseboard by elevating the column and manual focus.
Larger ratios possible by enlarging on the floor and manual focus.
- Dimensions, baseboard width: 54cm (21.26"), depth: 70cm
(27.56"). Maximum height: 104cm (41"). Weight: no precise idea but
something around 15-20kg (30-40Lbs)
- Head mounted on a parallelogram.
Allows an extremely fast ratio modification by releasing (big button on the right) and
varying the head's height.
Ratio continuously displayed on a luminous scale.
- Column can be rotated to enlarge on the floor.
- Column's height adjustable (around 40mm) to include an easel while maintaining the
auto focus.
- 12V/75W cold halogen bulb (see further for bulb specifications).
- Mixed diffuser/condenser lamp house.
- Dichroic infrared filter (hot mirror) placed at the entrance of the diffusion box.
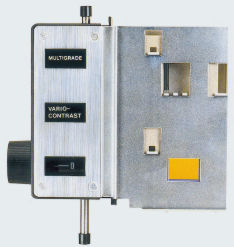
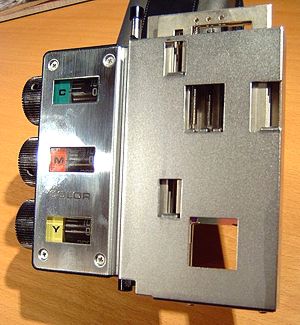
- B/W, Multigrade or color heads.
- Color head with 0-200 (Kodak CC 0-288, Agfa 0-400) dichroic filters. Illuminated scale.
A button lets you disengage the filters.
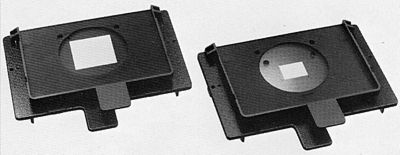
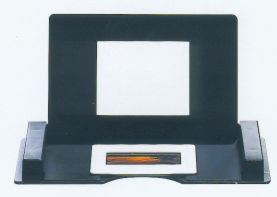
- Film holders:
24x36mm (with an upper anti Newton rings glass) standard
24x36mm (without glasses)
25x37mm for black borders (two anti Newton rings glasses)
28x28mm
13x17mm
For mounted slides (without glasses).
A support for uncut films does also exist.
- Partial negative masking possible.
- Voltage regulator available as accessory (see also home-made
regulator).
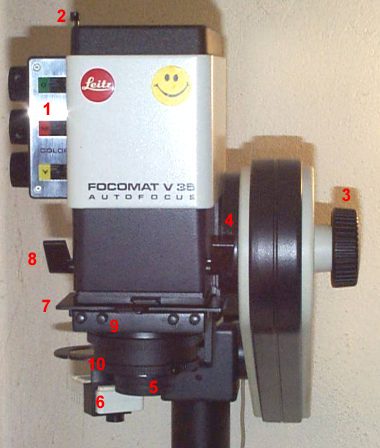
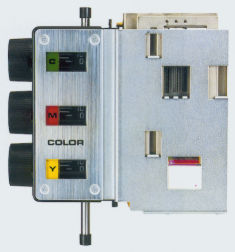
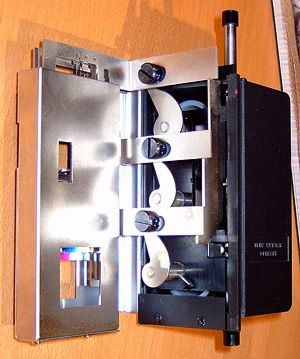
- Color head
- Filters disengaging lever
- Head's releasing knob
- Enlargement ratio scale
- Lens
- Jobotronic 200 probe positioned for integral reading (not standard part of
the V35)
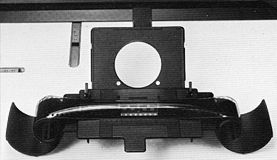
- Film carrier
- Film carrier releasing levers
- Negative masking knobs
- Manual focus ring
The smiley is not standard equipment ...
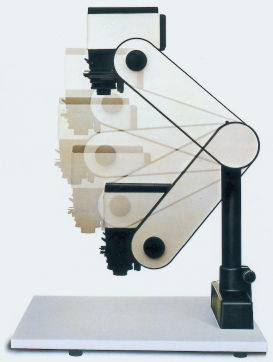
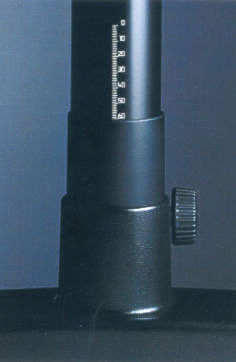
Enlargement ratio adjustment and column height adjustment to maintain the auto focus
also
with very thick easels.
As the V35 shows directly the enlargment ration, it's very quick to extrapolate
the exposure duration of a new size enlargment based on a previous one provided
we know the ratio and exposure time of the previous one.

- New time = new exposure time
- New ratio = new enlargment ratio
- Old ratio = old enlargment ratio
- Old time = old exposure time
Which gives us, for the AF range of the V35:
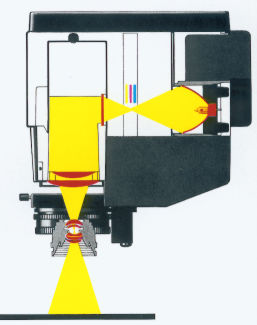
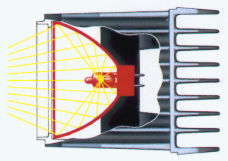
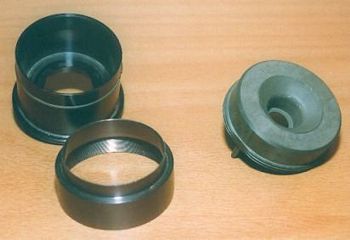
The light path and the lamp with its cooling cap.
Two versions of the mixing light boxes
The original model used a single condensor design right above the negative
carrier. During 1987, Leitz changed this light box by adding a second condensor
which purpose was to more evenly illuminate the negative.
Description of the differences between the two designs as published in Leica
Fotografie late 1987:
You can identify the later box by a (very) small dimple in one of the corners of
the output base of the light box (indicated by an arrow in following draft).
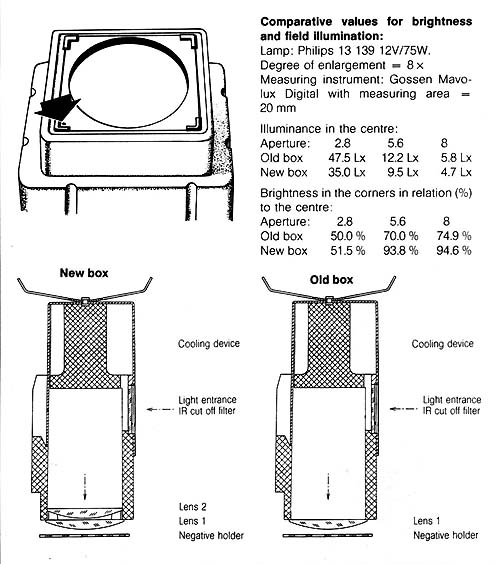
Thanks to Jem Kime for these informations regarding the mixing light boxes.
Original Bulbs
There has been two variations for the lamps: the very first models had the
Philips 6604 but a few years later, Leitz introduced another lamp shape
(envelope MR16 and unchanged socket GZ6.35 -> Philips 13139 or Osram 64615 or EFN), here are the differences:
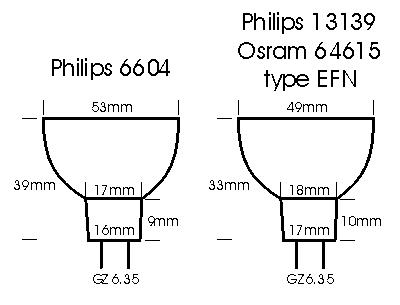 |
The original Philips 6604 are difficult to find, it could be easier to
replace the lamp holder. Officially, the Philips
13139 should be better than the other models ...
The Osram model has a notch on the front that prevents a proper positioning,
it's nonetheless possible to grind it down ...
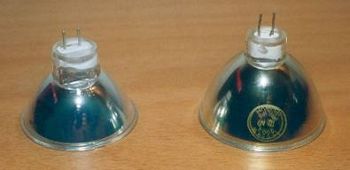
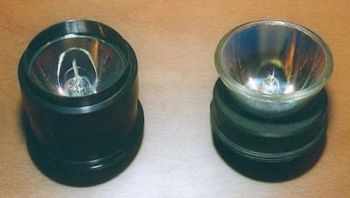
The actual Philips 13139 (left) and the old Philips 6604 (right)
|
These halogen bulbs heat a lot and their reflector is
transparent to IRs to evacuate the heat to the holder and then to the
external radiator.
As the bulb changed, the holder must also change and I
must admit the new one is a bit tinkered:
The actual lamp holder (left) and the old one (right), front view. |
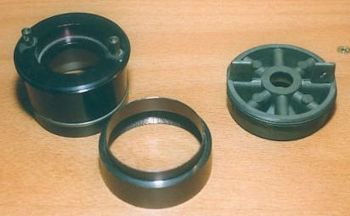
The same, rear view. |
The lamps in their respective holders. New (left), old (right) |
Light intensity reaches 5.85Lux at f/8 and an enlargement ratio of 10 (with
the Philips 6604).
If you can't find the recommended bulbs, use one with a projection angle of around 15� and
evacuates easily heat backwards (transparent to infra-red, also called "cold
mirror").
I heard of people putting 100W bulbs with wide angles of 30� or 45� that were complaining about long
exposures: they were only heating the head as the majority of the light remained trapped
inside ... |
Replacing the lamp holder by the new one
To find the genuine Leica new lamp holder may not be that easy but German
company Kienzle started to produce them a few years ago:
http://www.kienzle-phototechnik.de
Reusing the old reflector with a new filament
For those still using the first version of the lamp, it's possible to keep
the reflector (this is what matters for the lamp holder) and replace the
internal bulb that contains the filamen.
This DYI method is explained in following page:
http://www.theonlinedarkroom.com/p/leitz-v35-original-bulb-fix.html
Using a lamp with a wider beam angle
As explained above, the original beam angle is around 15� but finding such
lamp may not be that easy, then you could make an adaptor, a kind of "light
tunnel" to convey all the light emitted by the lamp to the lightbox.
To do this, us a metallic tube and paint the inside with a white heat-resistant
paint, this tube going from the outside of the lamp reflector to the entry of
the lightbox.
This way, light losses will be reduced and exposure timings will be short again.
Using LED Bulbs
The arrival of the new LED technology for lighting opens new possibilities:
- Under 12 V, in its original configuration: enveloppe MR16, socket
GZ6.35, projection angle 15� and supplied in 12V.
Not sure that such bulb does exist, you may need to switch to GU5.3 and
change the socket.
- Under 120/230V: enveloppe MR16, socket GU10, projection angle 15� and
directly supplied by the mains.
You need to change the socket but you can then skip the transformer and
connect directly to the mains.
- Under 120/230V: in modifying the back of the V35 and using other sockets
(E14, E27, ...)
In terms of power, to reach the same light output of the original halogen
75W, you need a LED power of around 15W.
Seen the very good efficiency of the LEDs, cooling the head is no more critical
and you can skip the original bulb holder and radiator which gives you a lot
possibilities to play with ...
The spectral emission of white LEds does not have the linearity of a halogen
light and will certainly require to adjust the filtering for multigrade B/W
printing.
For color printing, is suggest to wait until LED technology improves.
For the best DIYers, instead of using a white LED, it is possible to use a
set of RGB LEDs in additive filtration mode and using them either all together
with a fixed exposure time and adjusting the 3 LEDs output or separately with a
differentiated exposure time for each color channel.
Such an additive filtering allows to use the lamp for multigrade or color
printing without using the following filters of the original color head.
This technology is used by Heiland on their color/multigrade LED modules for
the V35:
http://heilandelectronic.de/led_leitz_v35/lang:en
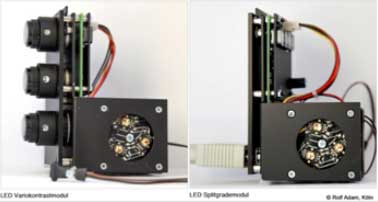
Color module |
Multigrade module |

B/W module |
|
Two more views of the color module
|
|
Exposure correction factors depending on filtration (color module)
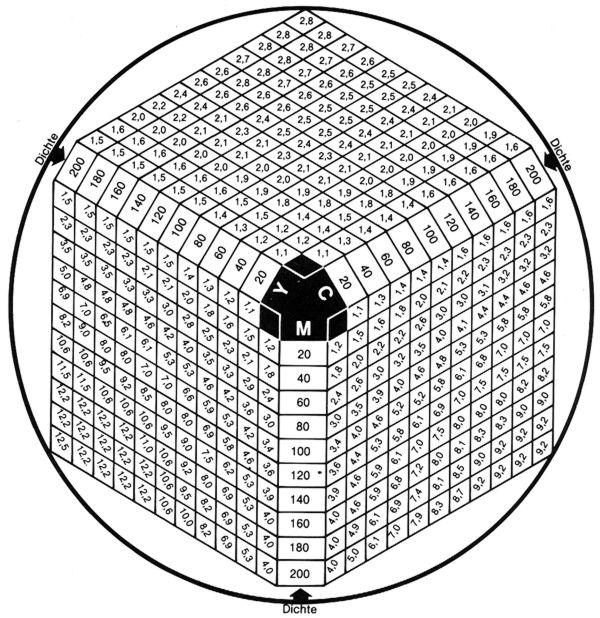
Follow the row/column of the filter you set and multiply time by the
corresponding factor.
More about filtering on this page.
|

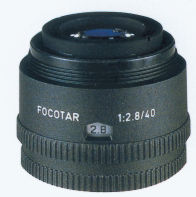
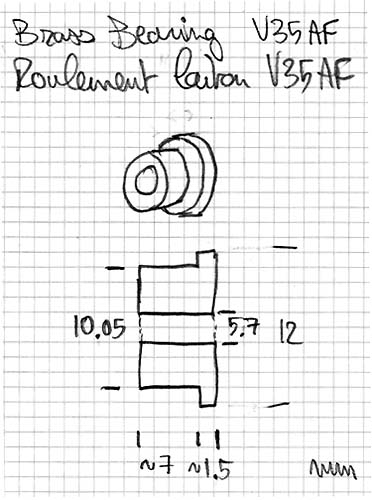
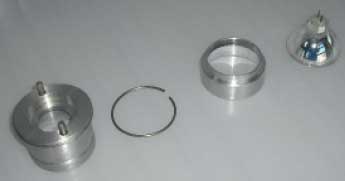
The heart of the auto focus system with its cam which varies the lens position and the
WA-Focotar 40mm f/2.8 lens with its luminous diaphragm scale and the lower stepped ring
which can also be lowered for a step less usage. On the right, the dimensions of
the brass bearing used in conjunction with the cam.
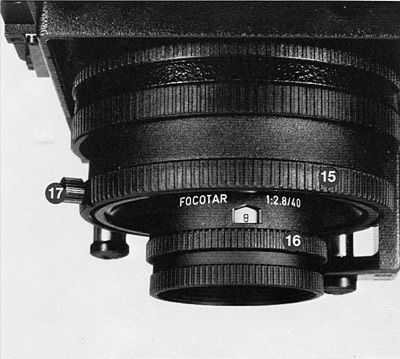 |
- Set column height to the height of the printing easel or to 0 if you don't
use an easel.
- Set head's position to its highest position.
- Focus with the large helicoidal ring (15).
- If the ring is outside the notch, unscrew the knob
(17) on
it and turn the ring (15) while maintaining the lens (16) with the other
hand until you reach the notch. Screw the knob (17) and check the focus again.
- Focus is maintained throughout all autofocus domain when the ring (15) is
in the notch.
|
|
The focusing ring has a very small screw opposite to the small knob you can see
on the picture. This small screw hides the mechanism that gives the
"stop" you can feel when you turn the ring which marks the auto focus
position.
It is strongly advised NOT to unscrew it as it retains a small bearing ball
compressed by a spring, chances to throw that ball to the opposite side of your
room are great (believe me) ...
Nonetheless, if you already had this bad idea, here are the dimensions of the
various components:
- Hole: diameter of 2mm (0.079")
- Bearing ball: diameter 1.8mm (0.071")
- Spring: diameter 1.8mm (0.071"), length 3mm (0.118")
|
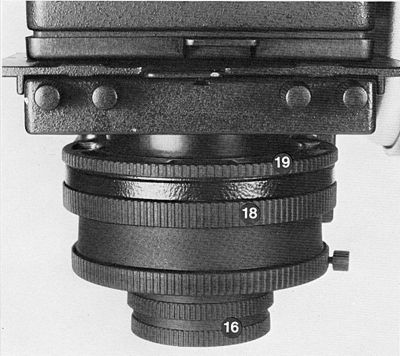 |
- Set head's position to its minimum height
- Unscrew the large ring (18)
- Turn the lens (16) together with the upper ring (19) until the diaphragm
window is in the desired position.
|
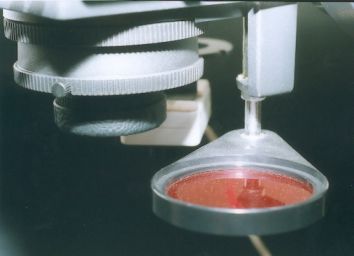
Multigrade RC paper printing without an easel is not comfortable with a color
head as you cannot switch from a red filter to the multigrade filter quickly. To make it easier, I've added a retractable red filter below the lens. |
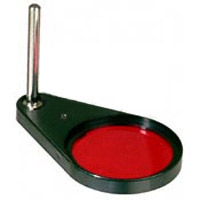
The model used for this mod looks very similar to this LPL/Omega version
ref. 200672.
I had to make a thread at the end of the shaft and glue on a nut to act
as a stopper. |
A view under the column with the baseboard dismounted showing the electrical
wiring:
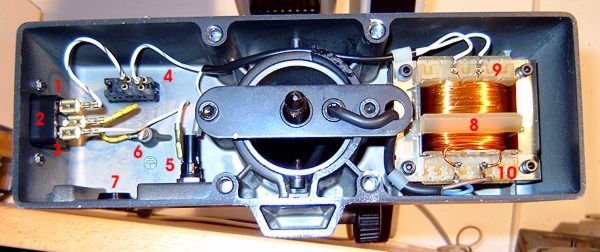
- Phase (Hot)
- Ground
- Neutral (Cold)
- On/Off switch
- Fuse
- Chassis grounding
- 220/110V selector (not wired !)
- 220/12V transformer
- 220V transformer primary
- 12V secondary transformer
Modification done for direct 12V wiring from a stabilized supply:
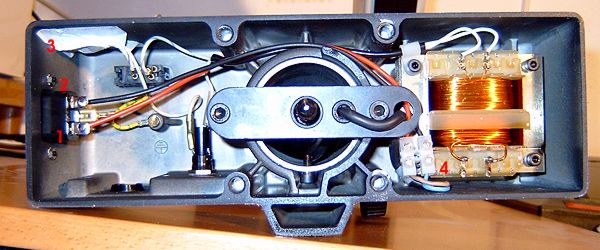
- 12V, pole +
- 12V, pole -
- Old wires kept for an eventual 230V recabling
- Direct connection on the wires going to the bulb